Series: Part 1: Yoga In Your Office
Are you married to your office? Do you love yoga but can't make it to class due to your work schedule? Have you fallen out of your yoga routine/practice because of your job? Are you all caught up with your life, career the stresses and competition to " make it ? ". If your answer is yes to any of these questions, then you will love this sequence. With simple instructions to follow alongside the chart, it will help guide you through each pose, explain what it works on internally, and how to progress the move when prompted and ready to do so.
In Part.1 of " Yoga in Your Office Series, " you will experience all the major muscles in your body become stronger, stretched, and toned.
You can do this sequence in 15 min if that is all the time you have and can spare. In 15 min you can get just what you are seeking to keep your day moving along the way you need it to. Ideally, though 20-30 minutes could create a particularly positive change within you and your environment. Chair yoga is beneficial for those who have mobility limitations as well. For full efficiency

Please remember to take shoes off before you begin this practice.
1. Begin in a seated position with your spine upright and feet pressing to the ground legs wide open.Sit up straight inhale as deep as you can roll your shoulders up and back lift your chin and on the exhalation bring your upper body in betweem your legs allowing your head to hang freely and your neck to relax. Your hands can be placed in the direction that feels most comfortable and at ease for you. Remain in this position for as long as you feel the need to. Focus on your breath and listen to your heart beat, this will assist you to slow down. Stay here as long as you need to and when ready push hands into the ground and gently roll up to a seated position.
Forward bend provides internal focus while flexing the spine forward and massaging the internal organs, it can also offer quiet reflection just close your eyes.
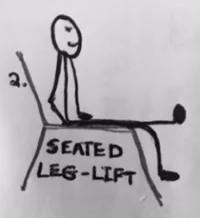
2. A: Seated leg lifted is a favorite of mine because it is two in one pose.Begin seated with spine straight hands to the side of the chair touching lightly. Inhale and lift the chin and chest contract your abdominal muscles, and on the exhalation extend your leg contracting the muscles on your leg especially the quadriceps maintaining the foot flexed toes up hold it and then switch to pointing for the same amount of time. When ready place foot back on the floor. Repeat to the other side.
B: Remain seated, extend the leg, and push both hands onto the sides of the chair, lifting your bottom up from the seat, your gaze should be between your thighs. The Leg on the floor can touch lightly or hover and if needed can add some pressure for assistance. Hold a minimum of 10 seconds then sit back down and release foot to the floor. Repeat to the other side.
As you can see, how dynamic this pose can be working on the main muscle groups starting from depressing the shoulders, activating the triceps, and firing into the abs, tons of core work and the many ways to progress here as well.

3. Seated single leg stretch, is a great pose to follow the last one we just did. Begin seated with your spine up right inhale bring the knee into the chest, reach to the lowest part of your leg if possible reach for the foot, exhale begin to extend the knee. Hold the position for as long as possible while simultaneously trying to lengthen the leg. Remembering to keep the spine as straight as possible. Try to hold for a few minutes, when ready repeat to the other leg. This is a great position to isolate the hamstring as you feel the back of your leg become straighter with time. Your spinal muscles are fully activated as you work to maintain keeping it straight.

4. Seated in the center of the chair both feet on the ground inhale and reach both arms behind the chair and wrap your fingers to get a good grip, continue to hold on to the chair. As you exhale maintaining both hands behind you on chair inhale again deepening the breath pushing the chest forward and tilting the head slightly back your gaze is upward, take a few breaths or hold it for as long as needed when ready just release the hands bringing them onto your thighs. This exercise is excellent for expanding the chest and extending the spine. While expanding the chest, the rib cage opens allowing to promote the flow of oxygen. In extending the spine, you counterpose pretty much your entire day as most of us spend time with our spines flexed forward adding unessasery pressure to the spine. My recommendation is to remember this one and do it throughout the day as many times as possible.

5. Chair pose with arms extended up towards the ceiling. Begin with both feet flat to the floor hip distance apart or aligned with the legs of the chair. Inhale reach both arms up towards the ceiling palms facing each other shoulders pressing down, exhale as you tilt the body forward pushing your feet into the ground and lift your bottom up from the seat to hover. While in this position focus on reaching with long fingers and pressing the shoulders down. Hold this position not the breath for a minimum of 10 seconds or more. When needed just simply sit on chair and rest arms on your thighs. Repeat as many times as needed. This works on the arms shoulders abdominal muscles thighs and glutes.

6. Please make sure the back of the chair is pressing up against the wall before you begin. Place both hands onto the edges of the seat while wrapping your fingers around the seat for a stable grip. Take one giant step back away from the chair with both feet forming a 90-degree angle with the body your torso is parallel to the floor. Continue to reach your chest to the ground while lengthening the back of the legs. Your breath should be slow and profound as you deepen the stretch. It extends the entire back of the legs while strengthening the legs knees and ankles and opens the shoulders. Hold this pose for a few minutes, to feel its benefits. When ready step foot back up to the chair and stand upright or you can continue to progress toward the next pose number seven.

7. While enjoying down dog position one of the many ways to progress this move is by lifting one leg. Reaching one leg straight up to the ceiling with the toes pointed for a little, and opposing the move by flexing. You can explore the variety of opening the hip and reaching higher towards the ceiling or by squaring off the hips. Hold for as long as possible to feel the benefits of this pose. This position strengthens the arms, core helps to improve hip flexibility and mobility while making awareness in the body whether the hips are closed or open. This position is also called a Downdog Split.

8. Supported Front leg split is next to follow. Lunging with your leg on the chair from down dog position is quite simple just take a deep breath and on the exhalation step the right foot onto the seat of the chair hands are lightly touching the top of the chair for balance, as you slowly extend your knee and holding this position for as long as possible. Another option available for those who can go deeper simply place hands on the outer edges on the sides of the seat for stability and a deep stretch or place hands on the top of the chair, erect the spine, while the left foot is flat on the floor anchored. This helps strengthen all local stabilizers the glutes, and the psoas muscle group intensely stretches the hamstring.

9. Warrior one with Foot on the chair. Inhale deeply, then exhale step the right foot on the seat of the chair keeping your knee bent, feel stable before you raise your hands to the ceiling. While arms are reaching upwards, your gaze should be forward, allow the shoulders to melt away from the ears, your fingers are fully extended and reaching upwards. Take a few breaths here feeling the solidity of this pose the " The proud and strong warrior " when ready if you want you can either a) Close your eyes as you continue to maintain this position and breath gently while keeping firm focusing on all the sensations as they come. There is also option b) which is just shifting the gaze upwards to the ceiling looking at the space in between your hands. Making things a little bit more challenging but feels uplifting when done. The standing leg is fully extended at the knee and the foot firmly grounded. Closing the eyes here is optional too. To release step the right foot down and repeat to the other side. While in Warrior 1 you can begin to feel the many areas being stretched starting from the chest, lungs, shoulders, neck, belly, the groin and psoas. Simultaneously strengthening the shoulders the entire arm and all the muscles on your back. Your thighs calves and ankles are also fully working here so they are being stretched and developing strength as well. The benefits are many and there is yet another variation for Warrior 1 and it will be included in the next series.

10. Side angle pose is next, otherwise known as side lunge. From your Down Dog position with hands on the seat, inhale deeply and on the exhalation step the right foot in between your hands The right hand can remain on the outside of the right foot or place it on the inside as you lift your left arm to the ceiling opening and exposing the left side of your body. Your standing leg is fully extended at the knee, and firmly grounded by the foot. Take a few breaths here maintaining your gaze forward. After holding as long as you can bring down the left arm placing your hand back onto the chair straddling the right foot again, step the foot back down and repeat to the other side. Here we can feel the position strengthen and stretch the legs the knees the ankles the groins, spine, waist, chest, lungs, and shoulders. It squeezes and stimulates the abdominal organs increasing stamina.

11. Plank position with your hands on the chair. Stand with legs slightly parted placing both hands onto the sides of the seat. The further back you move the harder and more challenging this can become. Stay in your plank position with both arms fully extended for as long as possible, then begin to bend your elbows wide out to the sides away from your body. Go as low or as high as you feel most comfortable as you explore what feels right to start with. Final but not least you can also bend the elbows wide and then straighten them to perform a push-up, even if the flexion in the elbow is a quarter of an inch. Do as many rounds as you can when done just step both feet up towards the chair and stand up straight. This dynamic pose is a total body exercise that will work your abdominal muscles and all of your upper body. The chest, triceps, shoulders, are working really hard to hold all of your body weight. You can fire into your thighs glutes and hamstrings too for a little extra sizzle.

12. Seated twist. Begin by sitting towards the center of your seat with your back away from the backrest, both feet flat on the floor anchored so they don't move your legs should be slightly parted. Both of your arms are by your side dangling. Inhale lift the right arm then exhale begin to twist your body to the right while reaching with your left arm and your right hand towards the backside of the chair. As you begin this motion the right arm naturally follows, place both hands where you feel most comfortable. Making sure your knees are directed to the front allowing your spine to twist efficiently. Try to hold this position as long as possible. When ready twist back to the center facing the front of the room and repeat to the other side. Twisting the spine helps to release and lengthen your spinal muscles allowing for more mobility, benefiting the soft tissue and enhancing the health of your discs and facet joints between the vertebrae. Twisting poses also help ring out the toxins from your internal organs so that when the twist is released it allows more oxygenated blood to flow. Thus allowing you to feel refreshed and clear headed.

13. Bridge pose. PLease make sure you don't rush the last parts. These final poses are just as important. Lie on the floor your legs up on the seat of the chair, with your knees bent. Arms are alongside your body palms facing down. Inhale deeply and begin pressing onto the feet, which causes you to fire into your glutes and hamstrings. As you lift your bottom off the floor, you will notice how your body creates a bridge. Hence the name of the pose. Hold as long as you can, when ready just place your bottom back onto the floor. Repeat as many times as you need to. This pose is a great way to begin to develop a back extension so that you can work your way to a full bridge. Extending your thoracic spine, opening your shoulders and chest while toning the upper back muscles. It also strengthens the legs, while lengthening the hip flexors something that is especially beneficial for those who sit for long periods at a time. This is a great pose to do closest to the last pose to do because it helps to calm the mind and ease the anxiety one might have created throughout their day. Not to mention this pose also helps the blood flow go to the head, and this contributes to reducing the aging process.

14. Resting pose. As we bring our practice to an end resting pose is very important especially after all the hard work you just did. Continue to lie on your back arms alongside your body resting. The back of your legs resting comfortably. The back of your head heavy but stable. Just simply close your eyes focus on breathing evenly fully and gently. Close your eyes to deepen your experience and allow yourself to feel at peace. Hold this as long as you can or need to.When ready open your eyes lower your legs to the right side of your body hold for a few seconds then gently push yourself up, bringing your yoga routine in the office to an end.
Stay tuned for Part 2 of this series as we will continue to progress moves and explore other Yoga poses.
Namaste Thank you for participating
www.Skye-Yoga.com